
세션 뷰가 아닌 Arrange View에서 오토메이션을 입력하는 방법을 알아보자.


Device Chooser는 믹서로 해주고, 그 아래는 Track volume을 선택해준다.

End point를 찍고, 시작점을 밑으로 드래그해서 크레센도를 만들어보자. (크레센도를 만들어줄 때 End point를 먼저 찍고, Starter point를 찍는 순으로 하는 것이 훨씬 편하고 효율적이다.)

키보드에 옵션 키를 누르면 마우스 커서가 Automation curve tool로 바뀌어서, 이렇게 오토메이션에 커브를 줄 수 있다.

트랙 박스에서 우클릭한 다음, Add Lane for Each Automated Envelope를 클릭해줘보자.

그러면 내가 만든 Envelope 오토메이션이 이렇게 구분되어서 뜬다. 이렇게 함으로써 한 눈에 내가 그린 오토메이션을 모두 볼 수 있는 것이다. (리버브 이펙트에 오토메이션을 준 것, 패닝에 오토메이션 준 것, 트랙 볼륨에 오토메이션을 준 것)
오토메이션을 그리는 또다른 방법이 있다.
위와같은 방법은 Track Automation이고, 이 외에 Utility를 추가해서 오토메이션을 해줄 수 있다.

우선 트랙에 Utility를 추가해준다.

우선 우리가 지금까지 해놓은 오토메이션을 모두 지워준다. (박스 우클릭한 다음에 Clear All Envelope을 눌러주면 됨)

Utility->Gain으로 Automation control chooser를 선택해준다.
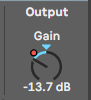
그럼 Utility에 있는 Gain 위에 빨간 점이 생기고, 내가 그린 오토메이션에 따라 이 노브가 움직이게 된다. 빨간 점은 이 노브에 오토메이션 데이터가 있다는 의미이다.

악기의 파라미터에도 오토메이션을 물론 줄 수 있다. 여기서는 Mallet on/off를 오토메이션 펜으로 그려줬다.

톱니파 오토메이션 만들기

하나 포인트를 만들어서 밑으로 내린다.

하나 더 만들어준다.

이렇게 만들어진 톱니파를 우클릭해서 복제해준다 (단축키 사용 추천)

그러면 반복되는 톱니파 오토메이션을 금방 만들어줄 수 있다.

이렇게 리듬을 갖는 오토메이션도 만들어줄 수 있다. 앞에는 3비트로 하고, 마지막 비트만 저렇게 해주면 EDM에서 많이 들리는 사운드가 만들어진다. (직접 해보면, 무슨 느낌인지 바로 알 수 있음.) 특히 Pad 신스에 이러한 테크닉이 많이 사용된다.
'Ableton Live > 3. 레벨링과 패닝' 카테고리의 다른 글
| 5. 핑크노이즈 믹싱 (1) | 2021.04.08 |
|---|---|
| 4. 오토메이션 녹음 (Automation Recording) (0) | 2021.04.08 |
| 2. 드럼 사운드 패닝 (2) | 2021.04.08 |
| 1. 레벨링과 패닝 (0) | 2021.04.08 |